Cain and Abel
The next step I did in my project was to find a tool that allows me to do an arp spoof of the device, so that I can monitor the traffic from and to the device. Arp spoof allows me to monitor the device by having the traffic from and to the mobile device pass through my laptop before it reaches its destination. In this post, I am going to give a tutorial on how to use Cain and Abel before I share my results. This post will serve as a helper to users who don’t know how to arp spoof using this tool. This post begins on the assumption that you have already downloaded the tool (the tool can be found at http://www.oxid.it/cain.html)
Before you can arp spoof with this tool you have to configure the tool to the network that your device is on (Please note that the target device and the device you are using have to be on the same network).

The tool is configured once you have clicked ok. Next, we have to start the sniffer so that the tool can populate all the hosts on the network in a list. To do this, click on the sniffer tab and then click on the “start/stop sniffer” in the toolbar. After that click on the blue cross to add hosts to the list.


A new dialog box should open. Once the dialog box opens make sure “all my hosts in my subnet” is checked and then press OK. The tool will add all the hosts on the network at the time. Make sure the target device that you are looking for is in the list before you start arp spoofing. Once you have verified that the target device Is on the network you can start the next step, arp spoofing the device.
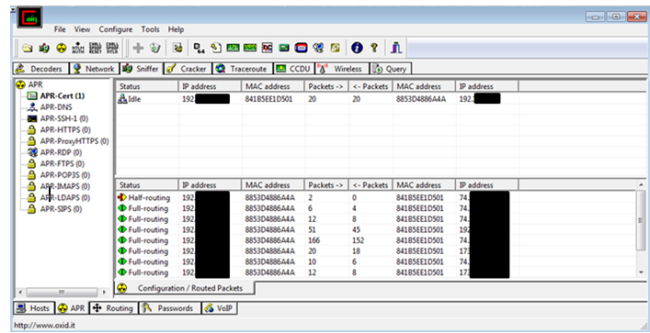
On the bottom toolbar, there is a yellow icon called APR, click on this icon. Once the icon is clicked a new tab will show. Next click on the blue cross to add a new “arp Poisoning router” to the list, once you click on the blue cross a window will open.


for this project, before I started arp spoofing my target device, I set up a WireShark capture so that I could monitor the data from the arp spoof. Once WireShark was set up, I poisoned the device and then filtered the packets captured in WireShark by the IP address of the target device that I was currently arp spoofing. for the results i got from Arp spoofing my device, please look for my next blog post.